Table of Contents
Overview
想定環境
| OS | CPU |
|---|---|
| Ubuntu 20.04 LTS | Intel Core i7-9700 CPU 3.00 GHz |
| Ubuntu 22.04.2 LTS | AMD Ryzen 9 7950X 16-Core Processor |
実行内容
Ubuntu Desktop login時に以下の処理が自動的に走る設定
- Gnome-system-monitorがRight topに表示
- Sound Ouput/Input Deviceを自分が指定したDeviceを選択
How to set-up start-up apps in Ubuntu?
- Startup Applicationsソフトを用いてGUI経由で設定
~/.config/autostart以下に.desktopファイルを設定
の2つの方法があります. 個人的には管理しやすさの観点から後者を採用していますが大差ありません.
(1) Set-up via Startup Applications
公式ドキュメントの説明
- You can configure what applications should be started at login, in addition to the default startup applications configured on the system.
- デフォルトでシステムに設定されているスタートアップアプリケーションに加えて, ログイン時に起動するアプリケーションを設定することができます
ActivitiesからStartup Applicationsを選択すると下記のようなウィンドウが立ち上がります.
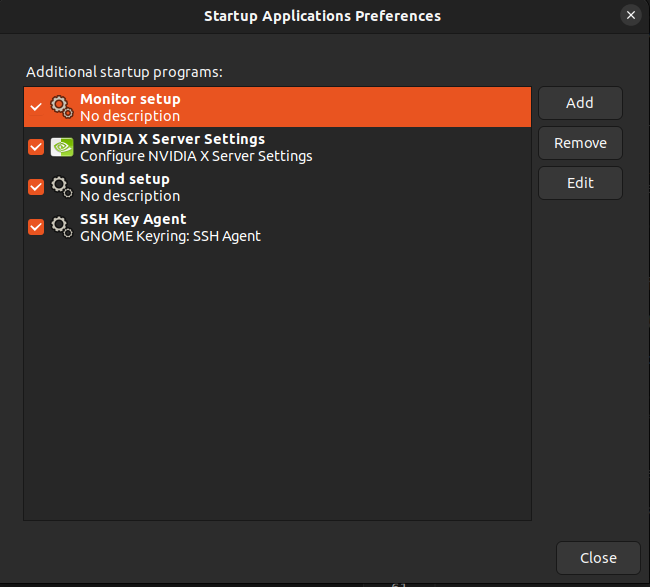
起動時のアプリケーションを追加したい場合は, 上記画面のAddボタンをクリックし, non-login & non-interactive shell で実行可能な command を入力するだけで完了です.
(2) Make .desktop file in ~/.config/autostart
.desktop ファイルの作成
.desktopファイル(デスクトップエントリ)はapplication launcherやアプリのmeta dataを定義したtext fileのことです.
.desktopファイルは(Key, Value)の組を記述します. 形式例としては以下です:
[Desktop Entry]
Version=1.0
Type=Application
Terminal=false
Exec=/home/user/run.sh
Name=Application Name
Comment=Test Application
Icon=/home/user/Pictures/icon.png
.desktopファイルは, Chrome経由でショートカットを作る際にも生成されるファイルで, ~/.local/share/applications を見てみるとChromeショートカットファイルを確認することができます. また, /usr/share/applications/を確認するとすべてのユーザーがアクセスできるDesktop Appsの一覧を見ることができます.
| PATH | 説明 |
|---|---|
/usr/share/applications |
システム全体でインストールしたアプリケーション |
~/.local/share/applications |
ユーザ固有のアプリケーション |
なおユーザーのエントリはシステムのエントリよりも優先されるという特徴があります.
Column: Desktop entry keys
Dektop entry keysの代表的なものを紹介します. 詳細はRecognized desktop entry keysを参考にしてください:
| Key | Description |
|---|---|
| Type | Application, Link, Directoryのどれか |
| Version | version |
| Name | アプリケーション名 |
| Icon | Icon画像をfull pathで指定 |
| Exec | 実行コマンド |
| Terminal | 実行時にTerminalを表示するか否か |
| X-GNOME-AUtostart-enable | 自動起動するか否かが設定 |
~/.config/autostart配下の.desktop ファイル
~/.config/autostart配下にアプリケーションを記載した.desktop ファイルを設置すると, login時に自動的にそのアプリケーションが立ち上がってくれます.
1
2
3
4
5
username@host ~/.config/autostart % ls -l
total 12
drwxrwxr-x 2 username username 4096 Jul 28 19:42 script/
-rw-rw-r-- 1 username username  162 Jul 28 19:29 hoo-app.desktop
-rw-rw-r-- 1 username username  171 Jul 28 19:42 hoge-app.desktop
.dektop file自体には実行権限を付与することなくても自分の場合は自動起動が確認できました.
今回の設定
Desktop Entryの作成にあたり, 今回の構成は以下のようにしました:
1
2
3
4
5
6
7
username@host ~/.config/autostart % tree
.
├── script                          # startup appのシェルスクリプト格納directory
│   ├── install-sound.sh            # 音声セットアップシェルスクリプト
│   └── start-system-monitor.sh     # System Monitorセットアップシェルスクリプト
├── sound-install.desktop
└── monistor-install.desktop
install-sound.shは普段の作業の中で利用したいスクリプトでもあるので,
PATHが通った自作シェルスクリプトディレクトリへsymblic link fileをln -sで作成しています.
Set up default audio device
Problem:
- login時に自動的に認識される音声deviceが自分の意図するDeviceではない(会議用の音声スピーカーになってしまう)
自分の環境はMonitorのスピーカーに加えて, CreativeのスピーカーとJabraヘッドホンを起動時に接続います. 仕事の会議のときはJabraヘッドホンを使いたい一方, YouTubeやSportifyはCreativeのスピーカーのスピーカーを使いたいので, 後者をデフォルトのOutputとして認識させたいのが今回の目的です.
Solution
Requirements
pactl: PulseAudioを操作するコマンドpulseaudio: POSIX用のsound server(音声デバイス管理用ソフト)
接続Deviceの確認
pactlではsinkとsourceに関する設定することができます.
sink |
Input device |
source |
Output device |
Input/Output Deviceを簡易的に検索したい場合はそれぞれ以下のコマンドを入力します:
1
2
% pactl list short sinks     # list-up output devices
% pactl list short sources   # list-up input devices
pactl list short sinks/sourcesを実行すると各デバイスについて以下の情報を得ることができます:
| sink_name, source_name | デバイス名(これが後に必要) |
| sound cards kernel module | audio処理を担当するkernel module |
| format | audio sample format(defaultはs16) |
| channels | audio channels |
| rate | sample rate |
| status | RUNNING, SUSPENDED, IDLE |
Shell Scriptの定義
output-device-name, input-device-nameを自分好みのデバイスに設定します
1
2
3
4
5
6
7
8
9
10
11
12
13
14
15
16
#!/bin/bash
# ---------------------------------------------------------------------------
# OUTPUT DEVICE
# ---------------------------------------------------------------------------
# get list of available available audio output devices (sinks)
# pactl list short sinks
# set default output device to Creative_Technology_Ltd_Sound_BlasterX_Katana
pactl set-default-sink 'output-device-name'


# ---------------------------------------------------------------------------
# INPUT DEVICE
# ---------------------------------------------------------------------------
# get list of available available audio input devices (sources):
# pactl list short sources
pactl set-default-source 'input-device-name'
Desktop Entryの設定
[Desktop Entry]
Type=Application
Name=Sound setup
Exec=<上記で作成したshell-scriptのfull path>
Icon=system-run
X-GNOME-Autostart-enabled=true
Set up System Monitor
Requirements
wmctrl: ウィンドウの位置を操作するコマンドgnome-system-monitor: system-monitor(defaultでinstallされている)
Shell Scriptの定義
1
2
3
4
5
6
7
8
9
10
11
12
13
14
15
16
17
18
19
20
21
22
#!/bin/bash
#-----------------------------------------
# General
#-----------------------------------------
# error handling
set -e

# variables
window_x_axis=7000
window_y_axis=-30
window_width=1130
window_height=670


#-----------------------------------------
# Main
#-----------------------------------------

sh -c '/usr/bin/gnome-system-monitor' \
    &
sleep 1 &&
    wmctrl -r "System Monitor" -e 0,$window_x_axis,$window_y_axis,$window_width,$window_height
sleep 1を加えているのはgnome-system-monitorが立ち上がる時間を待つためです.
Desktop Entryの設定
[Desktop Entry]
Type=Application
Name=Monitor setup
Exec=<上記で作成したshell-scriptのfull path>
Icon=system-run
X-GNOME-Autostart-enabled=true
References
(注意:GitHub Accountが必要となります)